Thursday, October 18, 2012

Simple Dinners: Enchilada Casserole

Time is never on my side... as evidenced by the fact that is has been way too long since my last blog post.  Lately I need meals to come together quickly and taste good because I don't have time for dinner meltdowns over who doesn't want to eat what.  My oldest son for some reason absolutely hates enchiladas, any enchiladas I have made in the past have resulted in one of those dreaded dinner table meltdowns.  Not because the enchiladas are bad... (I know you were thinking it!) because everyone else in the house gobbles them up with relish.  He just has an aversion to enchiladas, which really sucks for him because the rest of us love them.  So last night I was craving enchiladas but really didn't want to go to the time and trouble of rolling them all up, plus I still have very vivid memories of my hands in flames from the last time I made some.  I made green chili chick'n enchiladas with jalapenos in the sauce and OMG my hands BURNED for two days after wrapping all those up.  So I wanted all the yum of enchiladas without the work... typical huh lol.  Then the answer came to me:
"Enchilada Casserole!" YES!! Enchilada Casserole!  It came together very quickly with about 10 minutes in prep time, there was very little clean up involved, NO ROLLING of enchiladas and best of all my oldest surprised the heck out of me and wolfed it down and asked for more!

So here you are Vegan Enchilada Casserole:

Ingredients:
  1. 1 can vegan refried beans (Amy's has a good one)
  2. 1 can black beans
  3. 1 can or the frozen equiv corn
  4. 1 can (the 15 oz one not the huge one) enchilada sauce
  5. 1 can diced tomatoes
  6. 1 package vegan tortillas/wraps whole grain/spinach... whatever you have will work.  The spinach wraps would add some pretty color.  You need about 12 if you use the smaller ones or 8 if you use the larger 10" ones
  7. 1 package pepperjack Daiya
  8. Olive oil for bottom of pan
Instructions:
  1. Heat oven to 350
  2. Heat up your refried beans (they are easier to spread around when warm) and corn in separate bowls in the microwave or pans on the stove
  3. Put enough olive oil in the bottom of a 13x9 casserole pan to coat
  4. Pour about 1/2 of your enchilada sauce into the pan
  5. In a large bowl mix (or the pot you warmed the corn up in if it's big enough) mix the remaining sauce, drained black beans, drained tomatoes, and corn together.
  6. Slice your tortillas/wraps in half (a pizza cutter works great for this) so you have a flat edge and then lay down a single layer to cover the bottom of your pan.  You can slice a few into quarters if you need to to cover the corners
  7. Layer 1/2 of the refried beans onto the tortillas you just laid down
  8. Do another layer of tortillas
  9. Cover this later with 1/2 of the black beans/sauce mixture
  10. Add a good handful of your Daiya over the layer (About 1/3 of the bag)
  11. Add another layer of tortillas
  12. Cover with remaining refried beans
  13. Add another layer of tortillas
  14. Cover with remaining black bean/sauce mixture
  15. Add another 1/3 of the Daiya to this layer
  16. Cover with a final layer of tortillas and then add the rest of the Daiya to the top
  17. Bake for 30 minutes and let it cool for about 10 minutes before slicing it up (the layers stay together better if you let it sit for a few minutes before cutting into it.
 You can top this with black olives, avocado slices, vegan sour cream and a sprig of cilantro for plating. 


Thursday, September 6, 2012

Mason Jar Salads with DIY Annie's Organics Roasted Garlic Vinaigrette

So hubby is on a BIG salad kick lately, like he's been eating BUSHELS of salad!  We make them up days in advance in mason jars. They stay crisp and fresh for about a week this way and they are quick and easy for him to grab one from the fridge in his mad dash out the door in the mornings.  We use lots of fresh organic veggies from our weekly produce box (we use Full Circle) and make super tasty healthy salads, the only drawback has been the dressing was getting pretty expensive.  He likes Annie's Organics Roasted Garlic Vinaigrette which runs about $5 a bottle and we've been going through about 2 a week.  So I decided to make my own today when making his salads.  The recipe is down at the bottom of this post :)

The salads have the following:
2 radishes
1 beet
1 carrot
1/2 a HUGE cucumber (if yours are smaller use a whole one)
2-3 cups of greens
and some thing crunchy on top (I rotate different kinds of nuts or seeds)

I set up all my fixins assembly line style and get to chopping.  You want to put all the "hard" veggies in the bottom of the jars, I usually stack radishes first, then beets, then carrots. 

Once you have all those chopped pour your dressing in until you have enough to barely cover them.  They will kind of pickle in the dressing while they wait for you to eat them over the week, trust me this is a good thing... it's sooo good! Also those are the veggies that won't get all soggy if they sit in dressing for days, you def don't want your dressing to touch your greens.

After you have your dressing in dice your cukes and put those in, then hand tear your greens and shove em it (don't be afraid to mash them in there, they will bounce back I promise!).  If you want to add things like chopped tomatoes, maybe some beans, quinoa or some avocado you have treated with lemon juice put those in BEFORE you put in the greens.  If you want to use grape or cherry tomatoes add those on TOP of the greens and then top with nuts and seeds. 

Then just screw on your tops and store in the fridge.  We have eaten these as many as 6 days after prepping them and they were still crisp and tasty. 

If you've never worked with beets before, don't be alarmed by the bloody hand look you will soon be sporting... and I HIGHLY suggest not wearing your favorite white t-shirt when prepping these unless you are wearing an apron... just take my word for it :)

Five beautiful healthy organic salads to nourish my hungry hubby all week.


The dressing!!

Try to use organic ingredients if possible.

Roasted Garlic Vinaigrette:

2 big ass heads of garlic, roasted for about 30 minutes
1 cup evoo
1/2 cup vinegar (I used plain white)
1/2 cup water
4tbsp lemon juice
1tsp sea salt
2 tsp fresh ground pepper
1 tbsp parsley
2 tbsp agave
1/4 tsp xanthan gum *I debated putting this in,  but I had it on hand so I did.  It is a thickener and binder and I wanted this dressing to be as close to the original my husband loves.


Once your garlic is roasted squeeze them out of the skins into your blender and then add all the other ingredients and blend. 

This made me 3 cups of dressing which was enough to dress all those salads pretty heavily and fill up the empty Annie's bottle to put back in the fridge.  Now get on with your happy salad eating self!


Monday, August 20, 2012

Tofu Scramble for Miniature Vegans aka a Tofu Scramble Your Kids Will Actually Eat


Ahhh tofu scramble... nothing screams breakfast more to me these days than a delish tofu scramble served with breakfast potatoes and a slice of toast.  However, my kids and I have VERY different ideas about what is delish... see to me this:
https://sphotos-b.xx.fbcdn.net/hphotos-snc7/308503_2057195238024_5424751_n.jpg

is a FABULOUS tofu scramble, but to my kids it is reason to run away from the table screaming.  "Ahhhh mom... what are all those bits!?"  "What are the yellow ones?"  "What are the red ones!?"  "Tomatoes, mom you know I hate tomatoes unless it's ketchup!"  "Mom you know avocado makes me barf!"  "Spinach!  Mom WHO eats spinach for breakfast!"


Sigh... so I decided to make a tofu scramble just for them with no "bits" of anything, no "barfy" stuff lol, no spinach... just a tofu scramble that in my opinion is scarily close to real scrambled eggs. 

It was super easy to throw together, only a handful of ingredients and the kids ate it all for breakfast this morning and asked for more!

Tofu Scramble Your Kids Will Eat 

  • 1 Block of extra firm tofu
  • 1/2 tsp tumeric 
  • 1/2 tsp BLACK salt black salt is the key in making these actually taste like eggs!  It is sulfury and tastes like egg yolks!  I buy it in the bulk section of my local health food store. 
  • 1tsp onion powder because the kids like the taste of food cooked in onions but not the oniony bits!
  • 1 tsp ground mustard
  • 1 tbsp nutritional yeast
  • Some fresh cracked black pepper to taste  If your kids get wigged out by the little black bits from pepper in their food you can try white pepper which adds the same flavors but is sneaky invisible! 
  • 2 tbsp almond milk, added in at the end I'm sure any non dairy milk will work, I just had almond on hand today
So I want to tell you first; DON'T freak out about pressing your tofu for this dish!  Somethings like tofu steaks and patties etc... yes you need to press out the water to cut it and maintain the tofu's shape, but with a scramble you are mashing the hell out of it anyway so it really doesn't matter.  The trick is to cook off the water!  So open your tofu, drain and hand squeeze what water you can out of it.  Then crumble it into your pan.  You want to heat it over a med high heat and you will start to see the water coming out of the tofu like in the photo below.

Once you start to see the water releasing you want to keep cooking it, stirring occasionally until all the water cooks off (about 3-5 minutes).  Then it should look like this:

Add the rest of your ingredients and cook for about 5 more minutes.  

It all looked a little dry to me so I added a splash of almond milk and stirred that around and cooked for like a minute or two more.  The result was this:
 A tofu scramble my kids actually ate!  And tell me that does not look just like scrambled eggs!? 

Plated with some breakfast potatoes, fruit and toast I was very pleased with what we put in their bellies this morning!

Friday, August 17, 2012

Family fun at Silverwood or as I have come to call it SilverWON'T

We took the kids to Silverwood last week and while we did have a really great time for the two days we spent there there was one thorn in my side about the trip... and that was the lack of vegan food and the lack of information about vegan options in the park.  That and coming from a girl who grew up in California with access to Disneyland, Magic Mountain, Universal Studios, Knott's Berry Farm, Six Flags, WaterWorld, Raging Waters and more I have HIGH expectations when it comes to theme parks and Silverwood ALWAYS seems to fall short for me, it just seems like a slightly more upscale version of your State Fair and when compared to the cost of parks that offer so much more than they do I find them HIGHLY over priced.  However... it is the ONLY game in town here so folks line up with their money in hand to get in and spend the day.  My kids are young enough that they don't really remember how awesome the theme parks in California are so they absolutely LOVE Silverwood and I try my best to enjoy it vicariously through their eyes. There is the amusement park side with a couple roller coasters, a small area with 5 or 6 tame rides for the littlest kiddos, a log ride, super fun river raft ride (which is always our favorite!), bumper cars and bumper boats, a couple of your typical spin-you-around-until-you-want-to-vomit type rides, carnival games, a train tour and carousel. And then on the other side of the park is a waterpark with some really great watersides, two wave pools, an awesome lazy river and super cool kids play area/climbing structure with big and little kid slides.  Honestly if it wasn't for the waterpark part of Silverwood I would not even want to go, the waterpark is the best thing it has going for it.  We spent HOURS floating the lazy river, and there is a swim up bar (yippee!) so you can get yourself a fruity adult beverage to float around with :)  Just make sure you figure out a way to bring some money in your swim suit (hello boobies!)  Note to mamas:  The waves in the wave pools can get CRAZY, I stayed towards the "shore" with my 3 year old and my 7 year old ended up going out a bit too far, got caught up in the sideways waves they were making at the time and had to have a lifeguard jump in after him all while I was stuck in the shallows with the little one.  I felt like such a horrible mom in that moment, what do you do??? Leave the little one alone and go in after him?  Well in the 10 seconds it took me to work it through in my mind the lifeguard jumped in and pulled him out and he was fine, no worse for wear just a little embarrassed.  He can swim but those waves were just too much for him, so I told him he always has to wear a vest in the wave pool no matter what.  I would recommend the same for any kids going into those wave pools that are not exceptionally strong swimmers, in fact I think it should be a policy of the park.  As big and strong as they make those waves, it is just way too easy for kids to get stuck in them.  Just my little FYI so you don't experience that same moment of terror I had.  Aside from that moment of drama we really enjoyed ourselves, my 3 year old Bella decided she was a mermaid and never wanted to leave the water.  She swam and played in the water so much both days that when we finally forced her out she was falling asleep within minutes :)

Anyway about the food... I wanted to plan ahead and know what was vegan to eat from the stands and restaurants within the park so I wrote to management a week before we were going and asked what they had to offer vegans to eat in the park.  The response I got back was so lacking in information or help it really kind of pissed me off.  This is the was the email conversation I had with the park staff:

Hello, my family is planning a visit to Silverwood and I would like to find out if any of the restaurants offer vegan dining options? Please let me know what, if any, vegan items are served in your park. A vegan item is one that is free of any animal flesh or animal derived ingredients such as eggs and dairy products (milk, cheese, cream etc).

Also are wagons allowed in the park?


Thank you in advance for your help.

Ash Menacho
Silverwood Theme Park
Silverwood Theme Park 

Ash,


We do have salads and some menu items that would work with your vegan diet. It will take some work on you part and we would recommend you speak with an employee before ordering so you can make sure that what you are getting will work for you. The other option is to just pack your own food and eat is out in the grassy area next to our parking lot. We do have a few table out there as well as plenty of room for a blanket picnic.


So it took them almost a week to get back to me and I started to wonder if they would ever write back so I called and spoke to someone who said they had "No idea what might be vegan in the park" and suggested we bring in our own food.  If you have food allergies or other dietary restrictions you can pack food into the park if you leave it in the fridge within the first aid center, you just have to go back there to get it when you want to eat.  Be advised you can NOT take a cooler into the park.  You can take your food in in ANYTHING but a cooler (we learned the hard way).  


When we got into the park I stopped to look at the menus at a couple of the places and there was NOTHING suitable, even the salads they mentioned in the email (which btw I didn't receive until the first day we were already at the park... lot of good that did us :/) were covered in meat and cheese.  As a mom with 3 kids I did not appreciate knowing that if I wanted to eat from the places in the park I would have to stop at each place and try to figure out if there was anything vegan there and if not then haul my hungry kids to the next place in an endless cycle of trying to find something to eat... it just seemed like it would turn into such a nightmare for us and totally take away from the fun and relaxation we were trying to enjoy on our trip. 

So we decided to take our own and I spent the better part of the day before we left preparing the food for our trip.  We decided to take our own food for every meal and snacks, rather than take any chances on not being able to find something to eat there.  My love of packing and list making and organization kicked in and I decided to just make the best of it and have fun making sure everyone had enough yummy fun food for 2 days.


I started off with a rough draft of the meal planning
Breakfast for Gabe Day 1 - Cereal in Ziploc "bowl," spoon, poptart and banana.
Once I had the meals planned I got to packing.  Each person had a Ziploc for each meal for the day and one for snacks.


Those then when into big grocery bags for each meal each day.
 And each bag was labeled to let me know what meal it was.
This is Breakfast for Day 2


A days worth of meals.  The ones that were getting left in the fridges in the park had our last name on them as well.
Lunches for the kids consisted of homemade Uncrustables, chips, cookies and pudding.

Grownups had Tofurkey, Daiya, and lettuce sandwiches with vegan mayo.
Hint:  Put your mayo in between slices of Tofurkey or cheese (not right on the bread)
to keep your sandwich bread from getting all nasty and soggy. 
I packed these sandwiches for lunches both days and the ones for day two
were just as yummy and fresh as the ones from the prior day.


Snacks were Primal vegan jerky, vegan fruit snacks, fruits and vegan "Pocky Sticks."


Pocky Sticks are a treat that my kids used to love but are not are not vegan, so I make my own with breadsticks and chocolate peanut butter.  The kids LOVE these.


Please ignore my messy counters I was prepping
all this food at once in a big hurry :)


For dinner each night we had salad jars.  I chopped red onions and radishes and put those on the bottom, then covered them with dressing (those got really nicely pickled in the dressing), next came carrots the quinoa and then greens, tomatoes and some garbanzos.  There might not look like there is much in those jars but you really shove and pack it in there and there is 3 heads/bunches of greens divided between he two jars.


Each night for dinner I went up to the counter at the BBQ place and asked for the paper "boats" and then I plated the salads.  Each jar held enough for me to make 4 salads this size out of.


Amy's vegan chili, corn, quinoa and garbanzo
beans made up our "tacos"
Dinner the first night was sandwiches and salads and on the second night we had "cold walking tacos" which I made from tortilla chips placed into the paper boats and then covered with cold chili, tomatoes, corn, quinoa and beans.  I packed some hot sauce packets we had laying around from Taco Bell for Mike and I to spice ours up.  They were really good, easy and filling but I totally forgot to take a pic of them all plated up :(


The breakfast cereal was eaten out of Ziploc "bowls."  I simply packed a portion of cereal in a baggie with a plastic spoon and when it was time to eat poured in a little soy or chocolate coconut milk.  The kids all did really well eating cereal like this, I was worried it would end up in a big mess but even my 3 year old was able to eat it without making a mess.  We even ate these in the car on the way down the first morning and not a drop was spilled.


Campfire Cuddles!


That's my daredevil hubs in the backcar of the coaster.

Me and my munchkins <3 :)

This one may have had a bit TOO much fun hehe

All in all we had a great trip, I just really REALLY wish that the park would make available a list of items that people with dietary restrictions can look at and decide what if anything they can eat in the park.  I have since written to them requesting they do just that as of yet no response to that email.

Goodbye Silverwood!


Sunday, July 22, 2012

Miche Bags! Vegan Purses!

Don't you hate it when you want to change purses and you have to take the time move all your stuff from bag to bag? I have a dozen purses in my closet each half filled with junk I didn't want to move out of it when I switched bags.

My good friend Ashley is a Miche rep and turned me on to these great bags. This is such a fantastic concept, you don't change purses, just the outer shell! So no transferring of junk from bag to bag, and the bases are designed to keep all your stuff neat and organized and the shells are avail in all kinds of fabulous stylish designs!

BEST OF ALL MICHE BAGS ARE VEGAN, made from 100% man-made materials!

There are some GREAT SALE prices right now and awesome anniversary bundles as well. Click on the link below to check out the fab bags and GREAT DEALS, I think the sale prices are good until the end of July.

If you have any questions at all please leave a comment and I'll do my best to get you an answer. Now go check them out and get yourself a fab new bag or two for summer!

https://ashleyhuth.miche.com/Shop?partyId=58436


Saturday, July 21, 2012

Blackened Chicken Fettuccine Alfredo - VEGANIZED!

Kinda slacking here I just realized I never posted the Vegan Blackened Chicken Fettuccine Alfredo dinner I made for my husband for Fathers day, yikes!  I promised a few people this recipe, so sorry it's late but here ya go!

I make it my mission to keep my husband a happy vegan, when eating out that is often not possible because he thinks he requires more than just a veggie sandwich or side salad and here in our town vegan eats are slim, although looking up with the recent opening of not one but TWO very vegan friendly spots! Anyway... aside from eating out, when we are at home I think I've got it nailed down pretty good.  As I said a few posts back there has not been one meal  from our prevegan life that I have not been able to successfully veganize, that does not mean there have not been a few misses here and there, there have definitely been some misses! But you know... if at first you don't succeed and blah blah all that jazz...  So I try try again and in the end I almost always end up with exactly what we were trying for.  Vegan fettuccine has been one of the misses for me in the past, I tried several different versions and none of them had that creamy, saucy, fettuccine taste I was looking for, so it's been on the back burner for a while.  Well this Fathers Day I wanted to knock my hubby's tastebuds right out of orbit!  So... I got to thinking about things he loved before we were vegan that I have not tried to make yet or have not perfected yet... fettuccine popped in to my head and then, you know because figuring out how to fix something you failed at in the past was not a challenge enough, I remembered about the Blackened Chicken Fettuccine Alfredo he used to order all the time and quickly devour at our fave Italian place.  If you have never had this before it's popular at a lot of Italian restaurants, basically it's fettuccine alfredo served with a chicken breast that has been blacked with cajun spices and some of the spices sprinkled on top of the noodles as well.  It was one of my husband's absolute FAVORITE dishes so it was time to give it the vegan treatment.  

I set about googling vegan alfredo sauce to get some ideas and I found lots of recipes that looked an awful lot like the ones I had tried in the past, I wanted something new... something I hadn't failed at in the past and then I found one that used cashew cream as a base instead of soy milk and I knew I had a winner!  I love cashew cream, it makes EVERYTHING fabulous and it's so easy to make.


I made a HUGE batch of this because I knew my husband would love it and I wanted him to have leftovers for lunch the next day.  The recipe below is going to give you enough for dinner for a family of five with fairly large portions (hey it was Daddy's day... let em eat!) and seconds (and eat... lol) AND to have some left over for lunches the next day.  If you don't want that much food cut the recipe in half and you should have just enough for dinner for a family of 4 or 5 :) 

This recipe uses a Cashew Cream identical to the Cashew Cream from the Vegan Fried Chicken post.  You will need some presoaked cashews for this. 
Cashew Cream Recipe is as follows:
    • 2 cups raw organic cashews
    • 2 1/2 cups water
Soak cashews in water overnight or bring the cashews and 4 cups of water to a simmer.  Remove from heat and let soak 1 hour.  Drain and rinse the cashews. 

This makes like 5 cups of cashew cream, you will need need all 5 cups for the alfredo sauce but if you make up a double batch you can save it and use it to make vegan fried chicken! The cream can be refrigerated for 1 week or frozen for 2 months.


 *TIP* I keep presoaked nuts of all kinds in gallon ziploc bags in the freezer.  I buy nuts in bulk and soak them in large quantities over night, then rinse and fill up the bags and freeze.  When I need some I just take out what I need they are presoaked and I'm all ready to go without waiting for the nuts to soak.

You will need the following:
  • 2 packages vegan fettuccine noodles *I dream of making my own pasta some day like these... but for now store bought noodles will have to do*
  • 2 packages Gardein Chick'n Scallopini
  • 5 cups of premade Cashew Cream from above

Blackened Chicken Spices:
  • 1 tsp paprika
  • 1/4 tsp salt
  • 1/2 tsp cayenne pepper
  • 1/2 tsp ground cumin
  • 1/2 tsp dried thyme
  • 1/4 tsp ground fresh ground black pepper
  • 1/4 tsp onion powder 
Mix all together in a bowl and set aside.
*Note this is only enough spice to cover 1/2 of the chicken patties (4 of them) and sprinkle a bit on the grownups plates because I didn't put the spices on the patties I was serving to the little ones.*

Fettuccine Alfredo Sauce: adapted from munchin with munchkin
  • About 1/3 cup evoo
  • 1 lb sliced or chopped baby bella mushrooms (the little portobellos) *how small you chop em up depends on whether or not you have to hide them from your kiddos!*
  • 1/4 cup white wine
  • 2 smallish or 1 large leek thinly sliced
  • 1 large shallot chopped
  • 1 head of minced garlic 
  • 2 tsp lemon juice
  • 1/2 tsp onion powder
  • 1/2 tsp garlic powder
  • 1/2 tsp red pepper flakes
  • 1/4 tsp nutmeg
  • 1/4 cup nutritional yeast
  • salt and pepper 
I served my main course with oven roasted asparagus and crescent rolls brushed with vegan butter.  If you want to do the same you will need:
  • 2 bunches of organic asparagus
  • 1 head minced garlic *yes! we like garlic here!* 
  • Salt
  • more evoo for drizzling
  • 2 packages of crescent rolls *yes they are vegan* we used the ones from Trader Joes
  • some melted Earth Balance or other vegan butter for brushing on the tops of your rolls
If you are anything like me and you are obsessed with making sure everything comes out of the oven/off the stove at exactly the same time to serve everything piping hot and perfect you are going to be a busy bee in the kitchen for the next 45 minutes or so :) Get the kiddos set up with a Disney movie, baby yoga dvd... coloring books or whatever will keep them out from under foot for about an hour, gather all of your ingredients on to your counter and...  

Ready?  Set. GO!
  1. Preheat your oven to 350 (or whatever your package of crescent rolls calls for).
  2. Blend your cashew cream as stated above.  Set aside.
  3. Premix your blackened chicken spices and set aside.
  4. Wash/chop/dice/mince all your veggies set aside in small bowls.
  5. Drizzle some oil on a baking sheet, wash and chop off the bottoms of your asparagus and place in a single layer on baking sheet. Sprinkle with a little salt and 1 head of minced garlic set aside.

  6. Prepare your pan and roll your crescent rolls per the package instructions, and set those aside with your asparagus pan.
  7. Set a large pot of water to boil for your noodles. 
  8. Put your asparagus and and crescent rolls into the oven with the asparagus on the top rack and the rolls on the middle.  Set a timer to bake these for 15-20 minutes, or whatever the instructions on your package of rolls says.
  9. Drizzle a large skillet with some additional evoo and heat to med.  Pan fry any of the Gardein you are not going to put the blackened chicken spices on according to the package directions, and set aside on a plate near or on your stove to stay warm.
  10. Sprinkle most your blackened chicken spice on a plate.
  11. Moisten the Gardein patties you are going to blacken with a little water and then coat them with the spices, then pan fry according to the package directions.  Set aside with the other ones to stay warm.  *If your little ones are as sensitive to hot spices as mine are you may want to put them on a separate plate or put a paper towel in between them so none of the spices rub off onto theirs*
  12. For the alfredo sauce:  In a large stock pot heat a little less than 1/2 the evoo over med heat and saute your mushrooms until they are tender, deglaze the pan with 1/2 the white wine.  Scoop out your mushrooms and set aside. 
  13. In the same pot heat the rest of your evoo over med heat and add your leeks and shallots.  Saute about 5 minutes, until tender.
  14. Right about now the water for your noodles should be boiling, so while the leeks and shallots are sauteing add your noodles to the water and cook according to your package instructions. 
  15. Back to the alfredo sauce... Add your head of minced garlic, and then drizzle with the remaining white wine.  Cook for a minute or two then whisk in your 5 cups of Cashew Cream, stir well.  Add lemon juice, onion and garlic powders, pepper flakes and nutmeg, stirring well.  Let it come to a simmer stirring CONSTANTLY until it thickens.  You will be able to tell right away when it is thickened, add in the nutritional yeast and season with salt and pepper to taste, add back in the mushrooms.
  16. Your noodles should be done, drain and then pour the noodles into the sauce pot.  Use tongs to toss the noodles and coat with sauce.  
  17. Your timer on the asparagus and rolls should be beeping at you so take them out.  
  18. Plate your masterpiece!  Twirl fettuccine into nests on your plates, sprinkle the grownups noodles with some of the blackened chicken spices, rough chop 1 chicken patty on top of the noodles, add some asparagus spears and a crescent roll or two and you are done! 
  19. Sit back and enjoy your meal and bask in all the ooohhhs and ahhhs of all your hard work :) a glass of wine would be great right now too!
  20. Get someone else to do the dishes!

My husband's face when he saw the special meal I had veganized for him was soooo very worth every minute I spent over the stove making this for him!!

Kiddo sized portions

For dessert we had brownies ala-mode with chocolate ganache brownies, served over homemade almond ice cream and drizzled with chocolate sauce... can you say vegan dessert heaven!


Thursday, July 19, 2012

Vegan Fried Chicken!

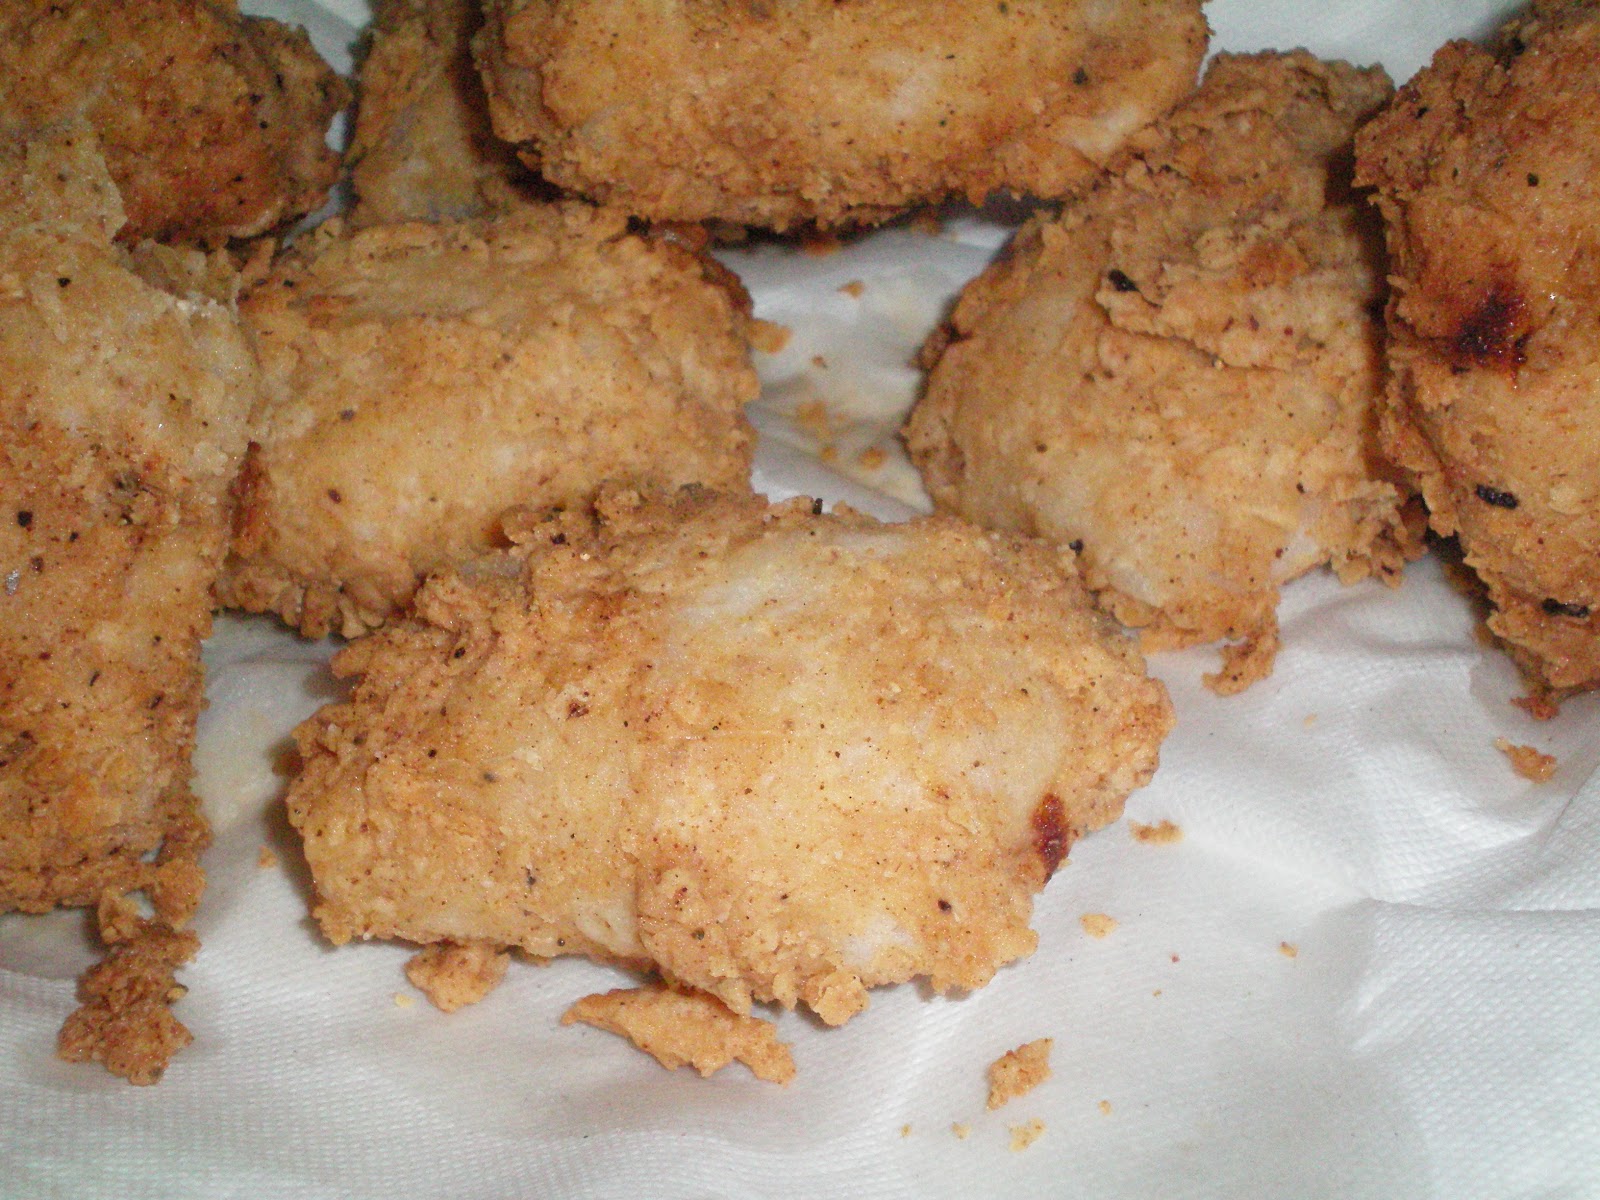
I have been checking out vegan cook books from the library like crazy lately, and loving almost all of them!  One that I have been very impressed with is Vegan Cooking for Carnivores by Roberto Martin who is Ellen's personal chef.  The tagline is "Over 125 Recipes So Tasty You Won't Miss the Meat!"   Well I don't miss meat at all anyway but my husband definitely does so I decided to test out the fried chicken recipe from the book for dinner last night.  OH.MY.GOSH!  HUGE success, the kids LOVED it, hubs LOVED it, I LOVED it and the last piece that was left over got fed to the lucky pup who LOVED it too!  I was concerned that it would take a long time but once I got the Gardein thawed it was actually pretty easy and quick to get it all assembled and cooked.  I have a deep fryer so I used that rather than pan frying it like he suggests in the book.  Also I didn't put in the blackening spice, as with the addition of hot sauce I was worried the kids wouldn't eat it if I made it any spicier.

There are a couple things that need to be done ahead of time for this.  You need to have some soaked cashews, if you are going to use the blackening spice for the extra heat it takes a couple minutes to mix that up, and you need your Gardein chick'n to be completely thawed so you can shape it, either leave it out on the counter for a few hours or use the defrost option on your microwave.

Blackening Spice Recipe is as follows:
    • 1tbsp paprika
    • 1tsp cayenne
    • 2 tbsp garlic powder
    • 2 tbsp onion powder
    • 1 tbsp dried thyme
    • 2 tbsp dried oregano
    • 1 tbsp kosher salt
    • 1 tbsp fresh ground black pepper
Mix all ingredients in a small bowl and store in an air tight container

Cashew Cream Recipe is as follows:
    • 2 cups raw organic cashews
    • 2 1/2 cups water
Soak cashews in water overnight or bring the cashews and 4 cups of water to a simmer.  Remove from heat and let soak 1 hour.  Drain and rinse the cashews. 

Blend soaked cashews and water in blender until completely smooth stopping a few times to scrape down the sides of the blender and make sure you get all the nuts blended.  The book recommends straining the cream to make sure there is no unblended particles in your cream, I processed mine for about 3-4 minutes in my Vita-mix and there was nothing put perfect smooth cream so I didn't bother straining.  The cream should be the consistency of heavy cream.

This makes like 5 cups of cashew cream, you only need 2 for the fried chicken recipe, the rest can be refrigerated for 1 week or frozen for 2 months.

*TIP* I keep presoaked nuts of all kinds in gallon ziploc bags in the freezer.  I buy nuts in bulk and soak them in large quantities over night, then rinse and fill up the bags and freeze.  When I need some I just take out what I need they are presoaked and I'm all ready to go without waiting for the nuts to soak.


Southern Fried Chick'n adapted from Vegan Cooking for Carnivores

Ingredients:
  • 1 1/2 cups unbleached all-purpose flour
  • 1 tbsp blackening spice or Chef Paul Prudhomme's Blackened Redfish Magic
    *Note* I left this spice out of the recipe when I made ours*
  • 1 tbsp garlic powder *also I noticed at the last minute I was out of garlic power too so we skipped this ingredient too.
  • 1 tbsp Old Bay Seasoning
  • 1 tbsp onion powder
  • 2 tbsp kosher salt
  • 2 cups Cashew Cream
  • 3 tbsp Tabasco sauce
  • 2 packages of Gardein Chicken Scallopini
  • 1 package rice paper spring roll wrappers
If you are pan frying you need about 2 cups high-heat oil for frying.

In a medium bowl mix flour, blackening spice, garlic powder, Old Bay seasoning, onion powder, and salt until well mixed.


In a separate bowl mix the cashew cream and Tabasco sauce.


Roll each Gardein patty into a ball and then shape into a 1-inch-thick patty.


Now it's time to put the "skin" on the chicken! You need a dish is big enough for the spring roll wrappers to fit into and deep enough to hold about a cup of water, a shallow bowl worked well for me.  Check your wrappers and make sure they don't have any holes or cuts.  You need one wrapper for each piece of chicken, the package of wrappers I bought from my local Asian market had like 50 wrappers so I just stuck the rest in a Zipoc and put em back in the pantry.  Put 1 cup of water as hot as you can stand into your bowl and you are going to soak one wrapper at a time for about 20 seconds or so, do not let them get totally soft.  Soak your first wrapper, take it out and spread it out smooth on your counter or cutting board.  Then put your Gardein onto the wrapper and roll it up in the wrapper like a burrito.  Repeat this with all 8 pieces of chicken.


Put a little of the seasoned flour onto a large plate or baking sheet.  Dip a patty in the seasoned flour bowl and coat it all over, then into the cashew cream and then dredge it back into the flour bowl, then place it on the floured plate.  Repeat with all the rest of the pieces.

The book recommends frying in a cast-iron skillet or heavy bottomed pan with sides that are at least 3 inches high.  I used our deep fryer heated to 375 and fried them for about 4 minutes.  I tend to burn almost anything I try pan fry, I can never get the heat right and always cook things too long, so using the deep fryer saves me from this issue the oil is all heated evenly and the timer beeps to let me know they are done.  If you are pan frying the recipe states to cook four patties at a time for about 2 1/2 minutes each side. 

After frying transfer to a paper towel lined dish.  Serve hot!  I served ours with smashed potatoes and baked white carrots.

So crispy and perfect!


Smashed potatoes and white carrots

The "skin" on these was sooo perfect, almost a little too realistic!

Perfectly juicy, crispy, hot and a little greasy... everything I remember fried chicken to be.

Princess portions!  My daughter's dinner plate was 1/2 a piece of chicken, 1 smashed potato and some of the baked white carrots.  She ate every bite of this!

OH!  I almost forgot!  Here is a coupon for Gardein products! 
*Tip*You can print the coupons twice from each compute you own*